Learn How To Draw A Flower: Simple Steps For Every Artist
Have you ever looked at a beautiful garden and wished you could capture that charm on paper? Maybe you're a parent hoping to share a fun, creative moment with your little one. Learning how to draw a flower is a wonderful way to start your artistic adventure, and it's actually much simpler than you might think.
This lesson is meant for younger artists, too. We hope you have a lot of fun following along with us and learning how to draw a cute flower for preschoolers. It's truly a rewarding feeling when you bring a blossom to life with just a pencil and some paper, you know?
Whether you're picking up a pencil for the first time or looking to add floral sketches to your drawing skills, this article is for you. We'll show you how to draw a flower easy and step by step, making it perfect for beginners and kids. Our fun tutorials make it simple to learn how to draw beautiful flowers, so, let's get started!
- Chuck Todd And Wife Kristian Todd Married
- Us Congresswoman Of Minneapolis Ilhan Omar Is
- Kyle Brown Wife Megan And Four Kids
- Kenny Babyface Edmonds Finalizes Divorce With Nicole
- Debbie Cartisano Where Is Steve Cartisano S
Table of Contents
- Why Draw Flowers? Finding Your Artistic Spark
- Getting Ready: What You'll Need to Draw
- Starting with Basic Shapes: The Foundation of Your Flower
- Adding the Stem and Leaves: Bringing Your Flower to Life
- Refining Your Flower: Making It Truly Yours
- Discover Easy Flower Drawing Techniques
- Practice Makes Perfect: Drawing 6 Easy Flowers
- Frequently Asked Questions About Drawing Flowers
- Continue Your Art Journey
Why Draw Flowers? Finding Your Artistic Spark
Drawing flowers is a really special thing to do. For one thing, they are everywhere around us, offering endless ideas. You can find them in gardens, parks, or even just in a picture, and they are always beautiful. It's a peaceful activity, too, that helps you focus and express yourself in a quiet way.
For younger artists, drawing a cute flower for preschoolers can be a very fun activity. It helps with hand-eye coordination and lets them explore colors and shapes. It's a simple way to boost creativity and, you know, just have a good time making something pretty.
Whether you're a beginner or an intermediate artist, drawing flowers offers a lot. It teaches you about natural forms, light, and shadow. Plus, it's a skill you can always build upon, adding more detail or trying different kinds of flowers as you grow. It's a bit like learning a new language, really.
- Carolin Bacic Celebrity Wife Wiki Age Height
- Perry Mattfeld S Wiki Husband Height Net
- Executive V C Of Dallas Cowboys Charlotte
- Does Phaedra Parks Own A Funeral Home
- Dr Cade Hunzeker Cause And Death How
Getting Ready: What You'll Need to Draw
Before you start, gather a few simple items. You won't need anything fancy, honestly. A pencil, an eraser, and some paper are the main things. You might want a few colored pencils or crayons if you plan to add color later, which is something many people enjoy doing.
Make sure your pencil has a good point, not too sharp, but certainly not dull. A dull pencil makes it harder to draw clear lines. And have your eraser handy; it's your friend for making corrections. We all make little mistakes, so, it's quite normal to use it.
Find a comfortable spot to draw, perhaps at a table with good light. This helps you see your lines clearly and keeps your hand steady. It's important to be relaxed when you draw, as that really helps your creativity flow, you know?
Starting with Basic Shapes: The Foundation of Your Flower
Thankfully, by using some basic shapes and putting in a little bit of practice, you can draw any kind of flower in nature in just a few steps. This is a secret that many artists use, and it makes drawing much less intimidating. It's like building with blocks, really, you start with simple forms.
We'll begin with the most basic parts of a flower: the center and the petals. Thinking of these as simple shapes, like circles and ovals, makes the whole process very approachable. You'll see how quickly your flower starts to take shape, too.
This method is especially helpful for how to draw a flower easy and step by step. It breaks down what might seem like a complex object into manageable pieces. So, let's get those simple shapes down first, and then we can add the pretty details.
The Center of Your Flower: A Simple Circle
To start your flower, draw a circle in the middle of your paper. This circle doesn't have to be perfect, not at all. It's just a guide for where the center of your flower will be. Think of it as the starting point for everything else.
This circle will be the heart of your blossom, where all the petals will connect. Make it a light line, because you might want to erase parts of it later. It's just a suggestion of a shape, in a way.
For younger artists, drawing a circle can be a fun challenge. Just encourage them to make any round shape. It's all about having fun and getting comfortable with the pencil. You know, practice makes things a bit smoother over time.
Petal Power: Adding the Outer Shapes
Now, around that central circle, draw your petals. You can make them simple oval shapes or more rounded, teardrop forms. Start by drawing a few petals evenly spaced around the circle, almost like the spokes of a wheel.
Don't worry about making each petal exactly the same size or shape. Flowers in nature are not perfect, and neither should your drawing be. That's part of their unique charm, actually. Just let your hand flow naturally.
You can add more layers of petals behind the first ones to make your flower look fuller. Just draw them peeking out from behind the front petals. This gives your flower a bit of depth and makes it seem more alive, you know?
Adding the Stem and Leaves: Bringing Your Flower to Life
A flower usually has a stem and some leaves, and adding these parts really brings your drawing to life. This tutorial shows how to draw a flower with a stem and a pair of leaves using examples done in a simple style. It makes your flower look complete and grounded.
These elements help balance your drawing and make it look more like a real plant. They also give you more areas to add color and detail later on, which is quite nice. It's about building up the whole picture, really.
Even simple stems and leaves can add so much character to your flower. You'll see how quickly your drawing transforms from just a blossom to a complete plant. So, let's get these important parts drawn, too.
Drawing the Stem: Giving Your Flower Support
From the bottom of your central circle, draw two parallel lines going downwards. This will be the stem of your flower. Make it as long or as short as you like, depending on how tall you want your flower to be. It's very simple, just two lines.
You can make the stem slightly curved if you want your flower to look a bit more natural, as if it's swaying gently in the breeze. A straight stem is perfectly fine, too, especially for beginners. It's all about what feels right to you.
Remember to draw lightly at first, just in case you want to adjust the length or curve. This allows you to easily make changes before you commit to darker lines. It's a good habit to get into, you know, drawing softly at the start.
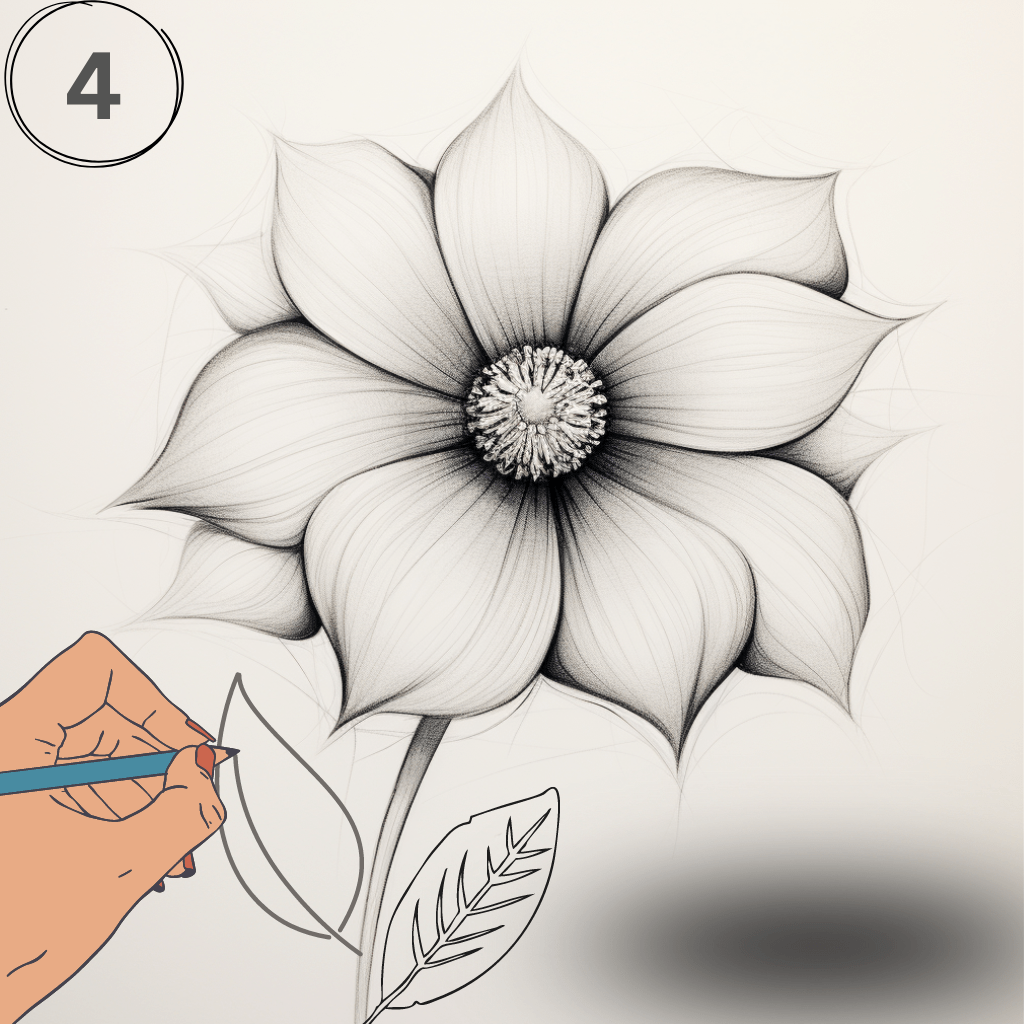
Leaf Details: Making Them Look Natural
Now, let's add some leaves to your stem. Draw them coming out from the sides of the stem, usually near the middle or lower part. Leaves are often shaped like elongated ovals or teardrops, sometimes with a gentle point at the end.
You can draw one leaf on each side, or just one, whatever you prefer. For a bit more realism, you can add a simple line down the middle of each leaf to suggest a vein. This small detail can make a big difference, honestly.
Again, don't worry about making them perfect. Leaves in nature come in all sorts of shapes and sizes. Just try to make them look somewhat natural and connected to the stem. It's quite forgiving, drawing leaves, you know?
Refining Your Flower: Making It Truly Yours
Once you have the basic shapes down, it's time to refine your drawing and add those personal touches. This is where your flower really starts to come alive and show its unique character. It's a very satisfying part of the process.
You'll clean up your lines, add some depth, and maybe even some color. This stage allows you to make your flower look more polished and finished. It's about bringing out the best in your initial sketch, you know, giving it that extra something.
This is also where you can experiment a bit and make choices about how your flower will look. There's no single right way to do it, which is the beauty of art. So, let's make your flower truly yours, shall we?
Erasing Guide Lines: Cleaning Up Your Drawing
Now that you have your main flower shape, petals, stem, and leaves, gently erase any guide lines that are showing through. These are the initial light lines you drew for the circles and ovals. You want your final lines to be clear and crisp.
Use your eraser carefully, making sure not to smudge your good lines. If you drew lightly at the beginning, this step will be much easier. It's a very satisfying part, seeing your flower emerge cleanly from the sketch.
This step makes your drawing look much more professional and finished. It's like tidying up after a big project. A clean drawing is much more pleasing to the eye, too, so it's worth taking your time here.
Adding Texture and Shading: Giving Your Flower Depth
To give your flower more depth, you can add some light shading. Think about where the light might be coming from. Areas that are further away or tucked under other petals would be a bit darker. Just use light pencil strokes.
You can also add small lines or dots in the center of the flower to suggest seeds or pollen. This adds a nice touch of texture. For the petals, you might draw very light lines following their curve to show their natural form. It's a bit like giving them a subtle pattern.
Don't overdo the shading at first. A little bit goes a long way in making your flower look three-dimensional. It's about creating a sense of roundness and reality. You know, just enough to make it pop off the page a little.
Color Choices: Bringing Your Flower to Life with Hues
This is where your flower truly comes to life! Choose your favorite colors for the petals, stem, and leaves. You can make your flower a classic red rose, a sunny yellow daisy, or even a fantastical purple bloom. There are no rules here, really.
When coloring, try to use smooth, even strokes. You can press a little harder in some areas to make the color darker, creating a bit of shading with your colors. This adds more interest and makes your flower look more vibrant, too.
Remember that flowers come in all sorts of color combinations. Feel free to be creative and try something new. It's your art, so make it look just how you imagine it. You know, sometimes the most unexpected colors look the best.
Discover Easy Flower Drawing Techniques
As you practice, you'll discover easy flower drawing techniques that work best for you. Some people prefer to start with the center, while others might sketch the overall shape first. There's no single "right" way, honestly. The key is finding what feels comfortable and natural for your hand.
One technique is to think of flowers as a collection of simple geometric shapes. A sunflower might be a large circle with many small ovals for petals. A tulip could be a cup shape on a straight stem. This simplifies the process a lot, you know?
Another tip is to observe real flowers closely. Notice how their petals overlap, how their stems bend, and how their leaves attach. You don't have to copy them perfectly, but observing helps you understand their structure. It's like doing a bit of research before you start.
Practice Makes Perfect: Drawing 6 Easy Flowers
To really get good at drawing flowers, practice is key. Learn how to draw 6 easy and simple flowers with a step by step, beginner friendly, guide. Trying different kinds of flowers helps you understand various shapes and forms, too.
Start with very simple flowers like daisies or tulips. Then, you can try something a bit more complex, like a rose or a lily. Each new flower teaches you something new about drawing different curves and angles. It's a bit like learning new words in a language.
Don't be afraid to try again if your first attempt isn't exactly what you hoped for. Every drawing is a learning experience. Just keep your pencil moving and enjoy the process. You know, it's about the journey, not just the destination.
Frequently Asked Questions About Drawing Flowers
What is the easiest flower to draw for beginners?
For beginners, a daisy or a simple five-petal flower is usually the easiest to draw. You start with a small circle for the center, and then add simple, rounded petals around it. It's a very straightforward shape to get down, you know, very forgiving.
How can I make my flower drawings look more real?
To make your flower drawings look more real, try adding subtle shading to show where light hits and where shadows fall. Also, observe real flowers to see how petals overlap and how leaves attach to the stem. Adding small details like veins on leaves or texture in the center can really help, too.
What basic shapes do you need to draw a flower?
You typically need circles for the center of the flower and the overall shape of the blossom. Ovals or teardrop shapes work well for the petals. For the stem, you'll use two parallel lines, and for leaves, elongated oval or teardrop shapes are common. It's all about building from these simple forms, really.
Continue Your Art Journey
Welcome to our art tutorial! In this video, we’ll take you through the process of drawing a beautiful flower from start to finish. Remember, drawing is a skill that grows with practice, and every line you draw is a step forward. You can always learn more about flower drawing from other artists, too.
Whether you're picking up a pencil for the first time or looking to add floral sketches to your drawing skills, this article is the beginning of a wonderful adventure. Keep practicing, keep observing, and most importantly, keep having fun with your art. Learn more about drawing basics on our site, and perhaps link to this page other art tutorials for more inspiration.
- Bishop Briggs Husband Did Not Propose Her
- Young Thug S Children Know Them All
- Who Is Evelyn Lozada Dating Queens Court
- Brantley Gilbert Age Net Worth Kids Weight
- Where Is Ross Caruso Going After Leaving
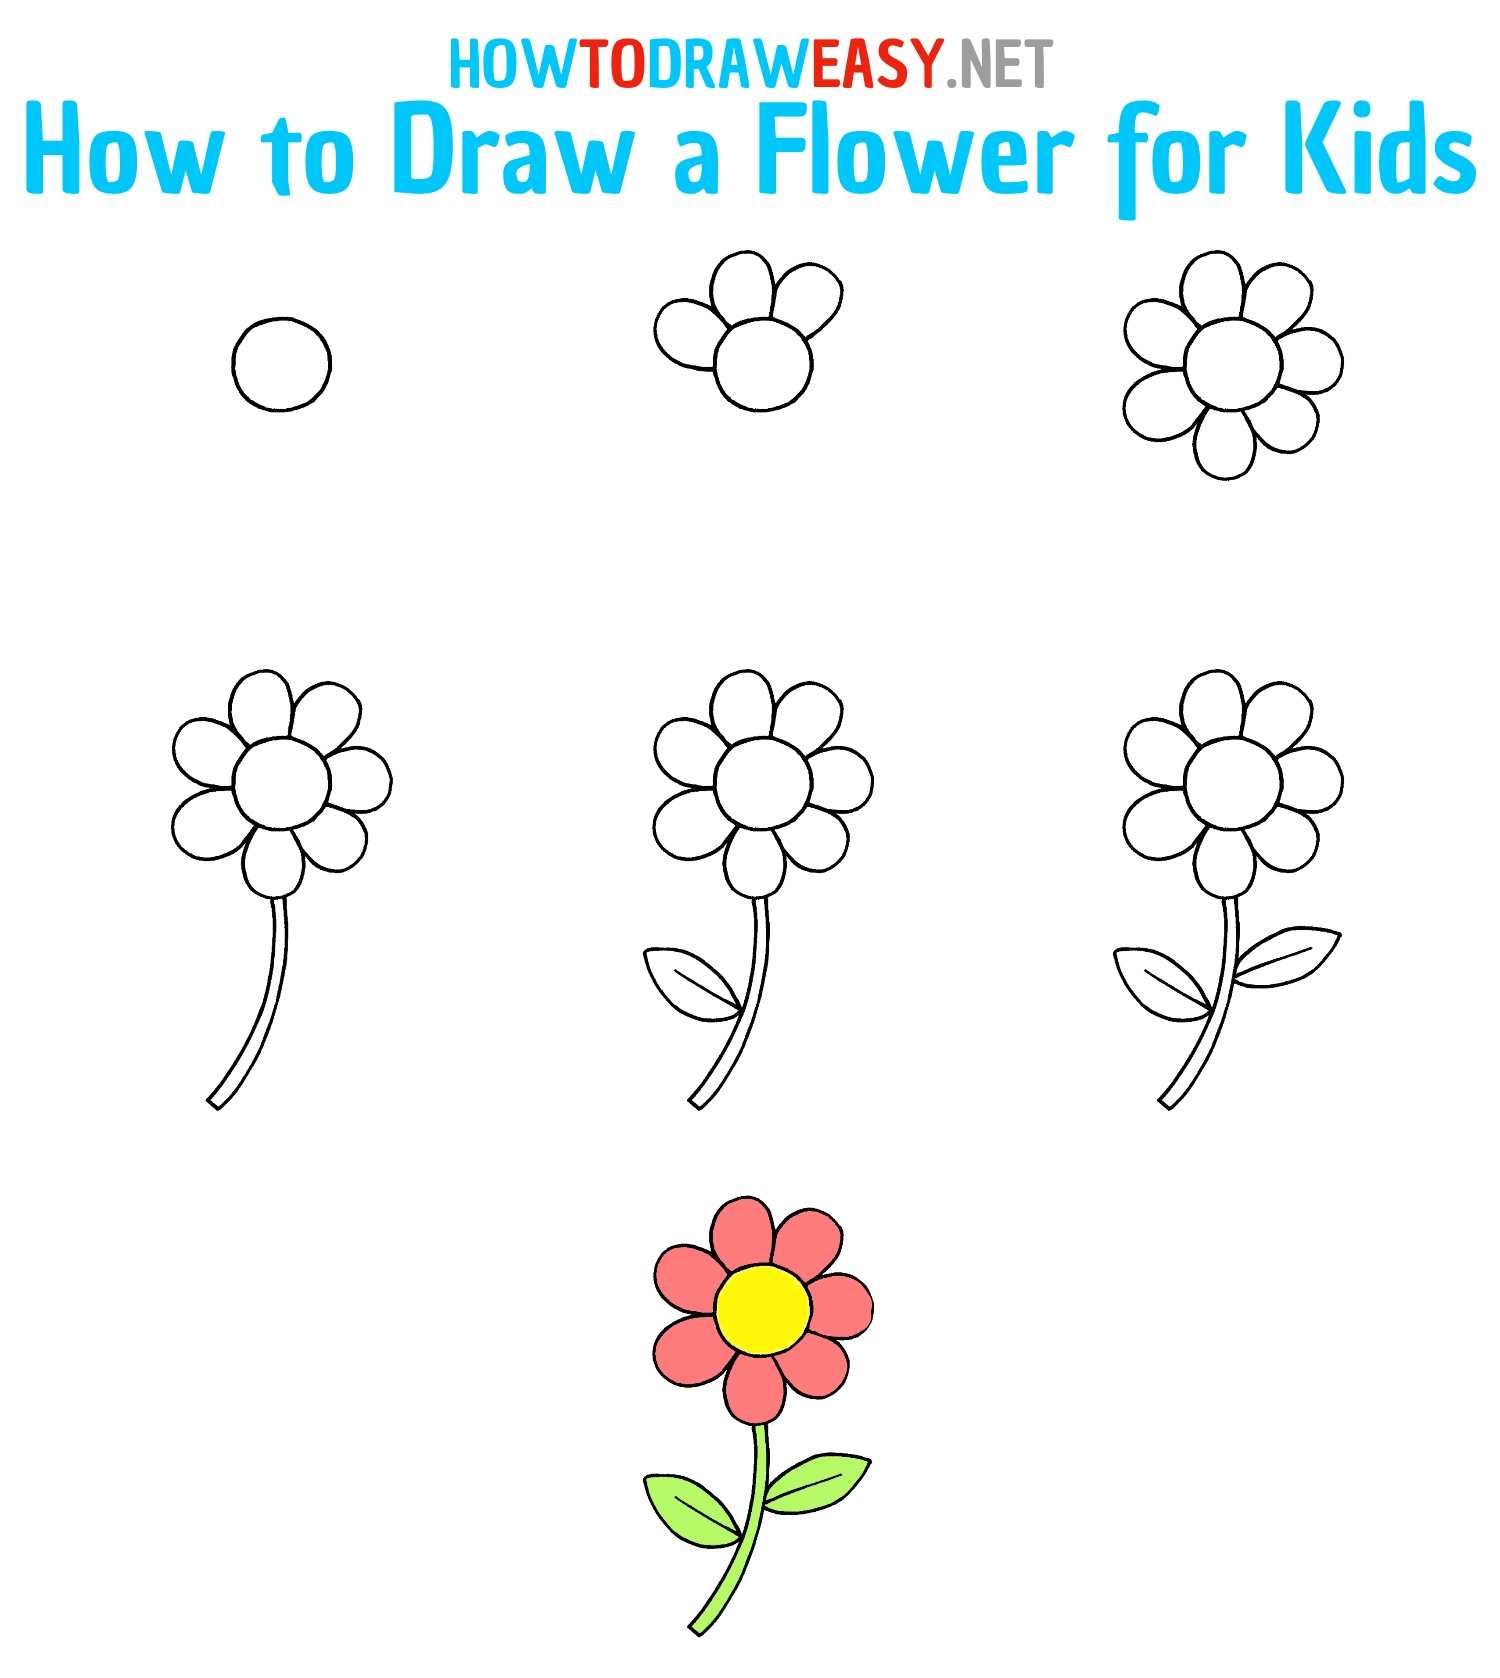
How to Draw a Flower for Kids - How to Draw Easy
How to Draw a Flower: A Beginner's Guide - Full Bloom Club
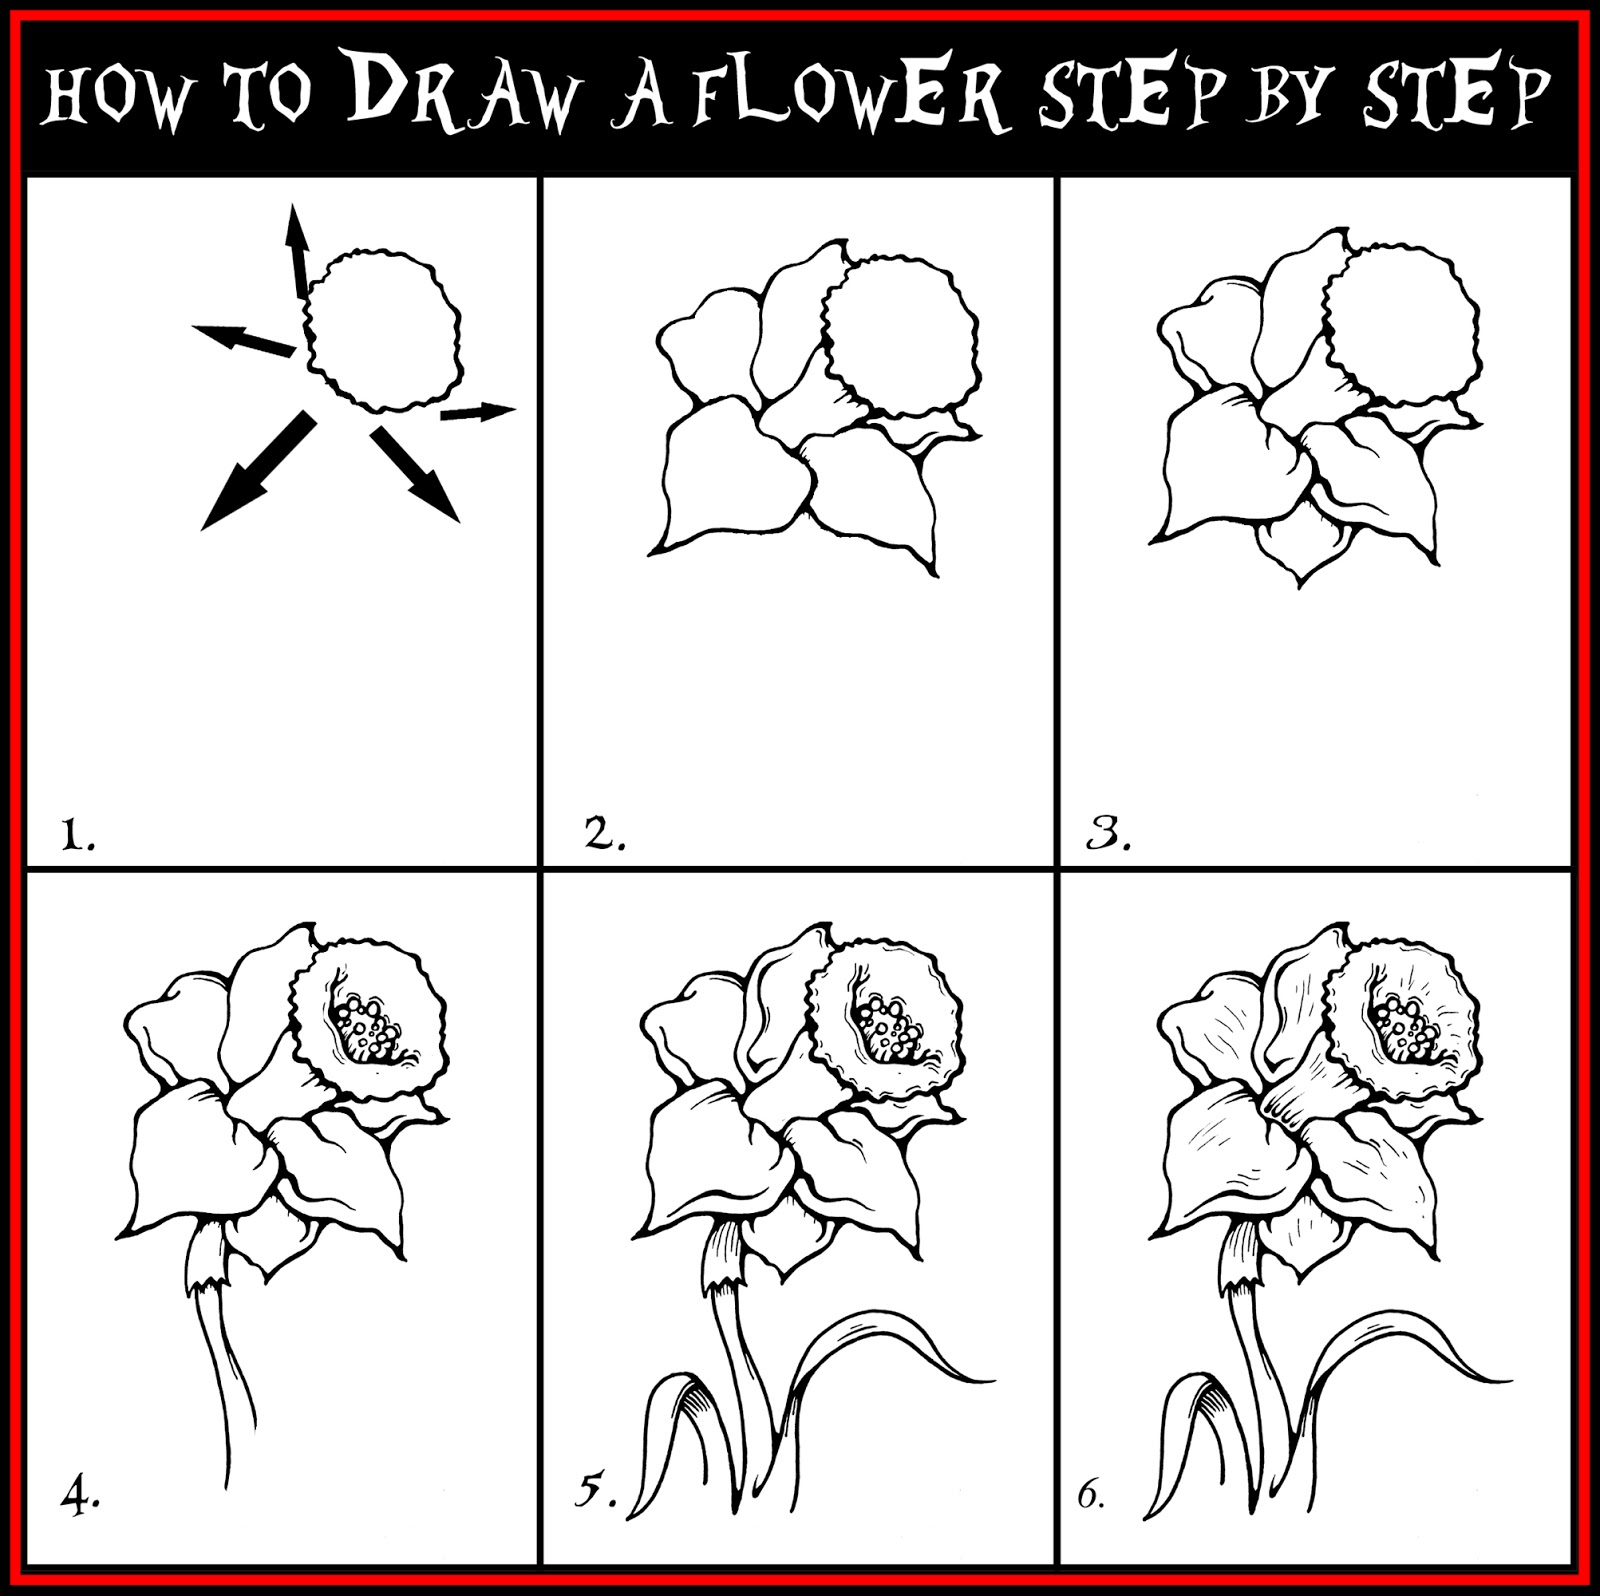
DARYL HOBSON ARTWORK: How To Draw A Flower Step By Step Drawing Guide
